Divisional Silicon Facility - Bond Lab
Testing of Wire Bonds
The DELVOTEC automatic bonders measure the cross-sectional deformation of the bond wire during the bonding process and monitor the applied ultrasonic power and bonding time. This gives a certain indication of the quality of the bonds, is however not sufficient to assess yield, reliability and longevity of the bonds.
Apart from an optical inspection with a good microscope (magnification x200) by an experienced operator and metallurgical analyses of the bond pads, bond pull tests provide quantitative information on the bond strength and variability.
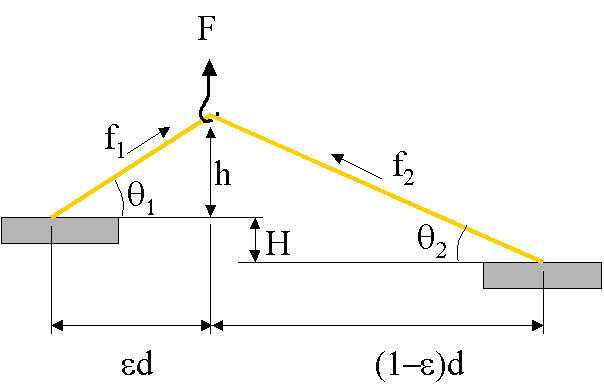
A pull test is performed by means of a micro-hook which pulls the bond wire vertically upwards. The control of the geometrical variables are essential for a quantitative test result.

In the two bonds are on the same level (H=0) and the loop is pulled in the center (e=0), the force in the bond wire is

For a given bond strength the result varies obviously with the ratio d/h or with the angle q. The ratio of the force applied to the bonds f1, f2 and the hook force F is expressed by the correction factor a, tabled below.
| q (ş) | corr. factor a |
| 10 | 2.88 |
| 20 | 1.46 |
| 30 | 1 |
| 40 | 0.79 |
| 50 | 0.65 |
| 60 | 0.58 |
| 70 | 0.53 |
| 80 | 0.51 |
| 90 | 0.5 |
One distinguishes destructive and non-destructive bond pull tests
Destructive pull tests are usually performed on test samples before a large volume production is started. However also during production or when a new batch of components arrives, destructive pull tests are a good way to assess the situation. In destructive pull tests the pull force is gradually increased until failure occurs. Possible failure modes are bond lift (from either end), wire break in the span, heel break, cratering, etc. The observed failure mode gives an indication which is the weakest element in the process. For 25 mm Al wires and a d/h ratio of 6 forces in the 8-10 gf (grams-force. 1 gf = 10 mN) range are expected.
Non-destructive pull tests are intended to reveal weak bonds while avoiding damage to good bonds. This means that the force has to be chosen such that good bonds are not stressed beyond their elastic limit. The MIL standard 883 specifies a non-destructive pull force F = 2.4 gf for Al wires of 25 um diameter. This is only an indication, since the actual forces f1, f2 depend always on the actual test geometry.
In both test modes, statistical analysis of the results (in terms of average value, is of interest to make predictions for large volume productions.
Status: 05/11/02
(Christian Joram - Ian Mcgill)